How to Use The JavaScript Intersection Observer API
Written by Kolade Chris | Sep 21, 2024 | #JavaScript | 5 minutes Read
In simple terms, the JavaScript intersection observer API is a tool that lets you know when an element on a webpage is visible on the screen.
The API makes it easy to detect when elements enter or leave the viewport, removing the need for complex scroll event handling. This allows developers to execute actions based on the visibility of elements within the viewport.
The said actions include lazy-loading images, implementing infinite scrolling, or triggering animations when elements become visible.
Keep reading as I walk you through the syntax of the Intersection Observer API and share three examples to help you start using it in your projects.
Basic Syntax of the Intersection Observer API
Below is the basic syntax of the intersection observer API:
const observerVariable = new IntersectionObserver( callbackFunc, observerOptions);
observerVariable.observe(targetElement);Let’s look at each of the items in the syntax:
InterSectionObserver()is the API itself. It’s a constructor, so you need to initialize it with thenewkeyword. It takes two parameters – a callback function and an optionaloptionsobject.callbackFuncis the callback function is the function that will be called whenever the observed element enters or exits the viewportobserverOptionsis an object that allows you to specify the root element for observing, margins around the root, and visibility thresholds to trigger the callback.observerVariableis the constant you have to assign the instance of theIntersectionObserverconstructor to. It’s an identifier (a name), so you can call it whatever you want.observerVariable.observe(targetElement)is the line that will finally do the slam dunk with theobserve()method. ThetargetElementis the element you want to do something with.
Let’s look at 3 examples of the ways you can use the intersection observer API:
- the first example will focus on observing a single element and using the basic syntax as is
- the second will observe one element too but make the syntax clearer
- the third will show you how to observe multiple elements without defining separate observers for them
Example 1: Using the Intersection Observer API to Observe a Single Element
Let’s observe the h1 element in the HTML code below:
<!doctype html><html lang="en"> <head> <meta charset="UTF-8" /> <meta name="viewport" content="width=device-width, initial-scale=1.0" /> <title>JS Intersection Observer API</title> <link rel="stylesheet" href="styles.css" /> </head> <body> <h1 class="heading">JavaScript Intersection Observer API</h1>
150 collapsed lines
<p> Lorem, ipsum dolor sit amet consectetur adipisicing elit. Dolore nihil veniam ipsa numquam totam eligendi eaque error eum, voluptates enim laudantium sapiente, hic unde inventore a dolorem adipisci consequuntur assumenda tempora nobis iste voluptate officiis nesciunt. Neque numquam iusto ipsum quos tempora delectus expedita autem eaque facere voluptate rerum ab possimus, explicabo quasi! Culpa asperiores temporibus dicta error est, consectetur exercitationem nihil optio voluptate pariatur. Voluptatem provident autem, officiis qui quod porro facilis libero molestias error dolorum, ad nihil suscipit recusandae, aliquid animi. A, temporibus? Optio fugit sed natus recusandae fugiat veniam illo hic aperiam officia inventore ea molestiae itaque qui, deleniti officiis? Aliquid fuga nisi veritatis commodi doloribus sit rerum alias adipisci natus. Incidunt totam reprehenderit atque deserunt veritatis iste perferendis tempora minima, commodi asperiores quae recusandae aliquam error quisquam ab eveniet quam provident, possimus natus, necessitatibus unde ratione. </p> <p> Lorem, ipsum dolor sit amet consectetur adipisicing elit. Dolore nihil veniam ipsa numquam totam eligendi eaque error eum, voluptates enim laudantium sapiente, hic unde inventore a dolorem adipisci consequuntur assumenda tempora nobis iste voluptate officiis nesciunt. Neque numquam iusto ipsum quos tempora delectus expedita autem eaque facere voluptate rerum ab possimus, explicabo quasi! Culpa asperiores temporibus dicta error est, consectetur exercitationem nihil optio voluptate pariatur. Voluptatem provident autem, officiis qui quod porro facilis libero molestias error dolorum, ad nihil suscipit recusandae, aliquid animi. A, temporibus? Optio fugit sed natus recusandae fugiat veniam illo hic aperiam officia inventore ea molestiae itaque qui, deleniti officiis? Aliquid fuga nisi veritatis commodi doloribus sit rerum alias adipisci natus. Incidunt totam reprehenderit atque deserunt veritatis iste perferendis tempora minima, commodi asperiores quae recusandae aliquam error quisquam ab eveniet quam provident, possimus natus, necessitatibus unde ratione. </p> <p> Lorem, ipsum dolor sit amet consectetur adipisicing elit. Dolore nihil veniam ipsa numquam totam eligendi eaque error eum, voluptates enim laudantium sapiente, hic unde inventore a dolorem adipisci consequuntur assumenda tempora nobis iste voluptate officiis nesciunt. Neque numquam iusto ipsum quos tempora delectus expedita autem eaque facere voluptate rerum ab possimus, explicabo quasi! Culpa asperiores temporibus dicta error est, consectetur exercitationem nihil optio voluptate pariatur. Voluptatem provident autem, officiis qui quod porro facilis libero molestias error dolorum, ad nihil suscipit recusandae, aliquid animi. A, temporibus? Optio fugit sed natus recusandae fugiat veniam illo hic aperiam officia inventore ea molestiae itaque qui, deleniti officiis? Aliquid fuga nisi veritatis commodi doloribus sit rerum alias adipisci natus. Incidunt totam reprehenderit atque deserunt veritatis iste perferendis tempora minima, commodi asperiores quae recusandae aliquam error quisquam ab eveniet quam provident, possimus natus, necessitatibus unde ratione. </p> <p> Lorem, ipsum dolor sit amet consectetur adipisicing elit. Dolore nihil veniam ipsa numquam totam eligendi eaque error eum, voluptates enim laudantium sapiente, hic unde inventore a dolorem adipisci consequuntur assumenda tempora nobis iste voluptate officiis nesciunt. Neque numquam iusto ipsum quos tempora delectus expedita autem eaque facere voluptate rerum ab possimus, explicabo quasi! Culpa asperiores temporibus dicta error est, consectetur exercitationem nihil optio voluptate pariatur. Voluptatem provident autem, officiis qui quod porro facilis libero molestias error dolorum, ad nihil suscipit recusandae, aliquid animi. A, temporibus? Optio fugit sed natus recusandae fugiat veniam illo hic aperiam officia inventore ea molestiae itaque qui, deleniti officiis? Aliquid fuga nisi veritatis commodi doloribus sit rerum alias adipisci natus. Incidunt totam reprehenderit atque deserunt veritatis iste perferendis tempora minima, commodi asperiores quae recusandae aliquam error quisquam ab eveniet quam provident, possimus natus, necessitatibus unde ratione. </p> <p> Lorem, ipsum dolor sit amet consectetur adipisicing elit. Dolore nihil veniam ipsa numquam totam eligendi eaque error eum, voluptates enim laudantium sapiente, hic unde inventore a dolorem adipisci consequuntur assumenda tempora nobis iste voluptate officiis nesciunt. Neque numquam iusto ipsum quos tempora delectus expedita autem eaque facere voluptate rerum ab possimus, explicabo quasi! Culpa asperiores temporibus dicta error est, consectetur exercitationem nihil optio voluptate pariatur. Voluptatem provident autem, officiis qui quod porro facilis libero molestias error dolorum, ad nihil suscipit recusandae, aliquid animi. A, temporibus? Optio fugit sed natus recusandae fugiat veniam illo hic aperiam officia inventore ea molestiae itaque qui, deleniti officiis? Aliquid fuga nisi veritatis commodi doloribus sit rerum alias adipisci natus. Incidunt totam reprehenderit atque deserunt veritatis iste perferendis tempora minima, commodi asperiores quae recusandae aliquam error quisquam ab eveniet quam provident, possimus natus, necessitatibus unde ratione. </p>
<div class="box"></div>
<p> Lorem, ipsum dolor sit amet consectetur adipisicing elit. Dolore nihil veniam ipsa numquam totam eligendi eaque error eum, voluptates enim laudantium sapiente, hic unde inventore a dolorem adipisci consequuntur assumenda tempora nobis iste voluptate officiis nesciunt. Neque numquam iusto ipsum quos tempora delectus expedita autem eaque facere voluptate rerum ab possimus, explicabo quasi! Culpa asperiores temporibus dicta error est, consectetur exercitationem nihil optio voluptate pariatur. Voluptatem provident autem, officiis qui quod porro facilis libero molestias error dolorum, ad nihil suscipit recusandae, aliquid animi. A, temporibus? Optio fugit sed natus recusandae fugiat veniam illo hic aperiam officia inventore ea molestiae itaque qui, deleniti officiis? Aliquid fuga nisi veritatis commodi doloribus sit rerum alias adipisci natus. Incidunt totam reprehenderit atque deserunt veritatis iste perferendis tempora minima, commodi asperiores quae recusandae aliquam error quisquam ab eveniet quam provident, possimus natus, necessitatibus unde ratione. </p>
<p> Lorem, ipsum dolor sit amet consectetur adipisicing elit. Dolore nihil veniam ipsa numquam totam eligendi eaque error eum, voluptates enim laudantium sapiente, hic unde inventore a dolorem adipisci consequuntur assumenda tempora nobis iste voluptate officiis nesciunt. Neque numquam iusto ipsum quos tempora delectus expedita autem eaque facere voluptate rerum ab possimus, explicabo quasi! Culpa asperiores temporibus dicta error est, consectetur exercitationem nihil optio voluptate pariatur. Voluptatem provident autem, officiis qui quod porro facilis libero molestias error dolorum, ad nihil suscipit recusandae, aliquid animi. A, temporibus? Optio fugit sed natus recusandae fugiat veniam illo hic aperiam officia inventore ea molestiae itaque qui, deleniti officiis? Aliquid fuga nisi veritatis commodi doloribus sit rerum alias adipisci natus. Incidunt totam reprehenderit atque deserunt veritatis iste perferendis tempora minima, commodi asperiores quae recusandae aliquam error quisquam ab eveniet quam provident, possimus natus, necessitatibus unde ratione. </p>
<p> Lorem, ipsum dolor sit amet consectetur adipisicing elit. Dolore nihil veniam ipsa numquam totam eligendi eaque error eum, voluptates enim laudantium sapiente, hic unde inventore a dolorem adipisci consequuntur assumenda tempora nobis iste voluptate officiis nesciunt. Neque numquam iusto ipsum quos tempora delectus expedita autem eaque facere voluptate rerum ab possimus, explicabo quasi! Culpa asperiores temporibus dicta error est, consectetur exercitationem nihil optio voluptate pariatur. Voluptatem provident autem, officiis qui quod porro facilis libero molestias error dolorum, ad nihil suscipit recusandae, aliquid animi. A, temporibus? Optio fugit sed natus recusandae fugiat veniam illo hic aperiam officia inventore ea molestiae itaque qui, deleniti officiis? Aliquid fuga nisi veritatis commodi doloribus sit rerum alias adipisci natus. Incidunt totam reprehenderit atque deserunt veritatis iste perferendis tempora minima, commodi asperiores quae recusandae aliquam error quisquam ab eveniet quam provident, possimus natus, necessitatibus unde ratione. </p>
<p> Lorem, ipsum dolor sit amet consectetur adipisicing elit. Dolore nihil veniam ipsa numquam totam eligendi eaque error eum, voluptates enim laudantium sapiente, hic unde inventore a dolorem adipisci consequuntur assumenda tempora nobis iste voluptate officiis nesciunt. Neque numquam iusto ipsum quos tempora delectus expedita autem eaque facere voluptate rerum ab possimus, explicabo quasi! Culpa asperiores temporibus dicta error est, consectetur exercitationem nihil optio voluptate pariatur. Voluptatem provident autem, officiis qui quod porro facilis libero molestias error dolorum, ad nihil suscipit recusandae, aliquid animi. A, temporibus? Optio fugit sed natus recusandae fugiat veniam illo hic aperiam officia inventore ea molestiae itaque qui, deleniti officiis? Aliquid fuga nisi veritatis commodi doloribus sit rerum alias adipisci natus. Incidunt totam reprehenderit atque deserunt veritatis iste perferendis tempora minima, commodi asperiores quae recusandae aliquam error quisquam ab eveniet quam provident, possimus natus, necessitatibus unde ratione. </p>
<div class="circle"></div>
<script src="script.js"></script> </body></html>Here’s the CSS for the HTML:
* { margin: 0; padding: 0; box-sizing: border-box;}
body { max-width: 1000px; margin: 0 auto; transition: 2s ease-in-out;}
h1 { margin: 1rem 0;}26 collapsed lines
p { margin: 4rem 0; line-height: 1.5;}
@keyframes rotate { from { transform: rotate(0deg); } to { transform: rotate(360deg); }}
.animate { animation: rotate 2s linear infinite;}
.box { height: 400px; width: 400px; background-color: #2ecc71; transition: background-color 0.3s;}
.circle { height: 400px; width: 400px; background-color: #2ecc71; border-radius: 49%;}To start observing the h1 element, you need to reference it with querySelector [or your favourite method of doing so].
I’ll do that by targeting the .heading class of the h1:
const h1 = document.querySelector('.heading');The next thing to do is to create a new instance of the intersection observer API and pass in the callback and the options.
I’ll start by defining an observerh1 variable set to a new instance of IntersectionObserver(). I will also start observing the h1 element straight away:
const observeh1 = new IntersectionObserver();
observeh1.observe(h1);For the callback, I’m going to start with an entries parameter for an arrow function, I’ll also log the entries parameter to the console:
const observeh1 = new IntersectionObserver((entries) => { console.log(entries);});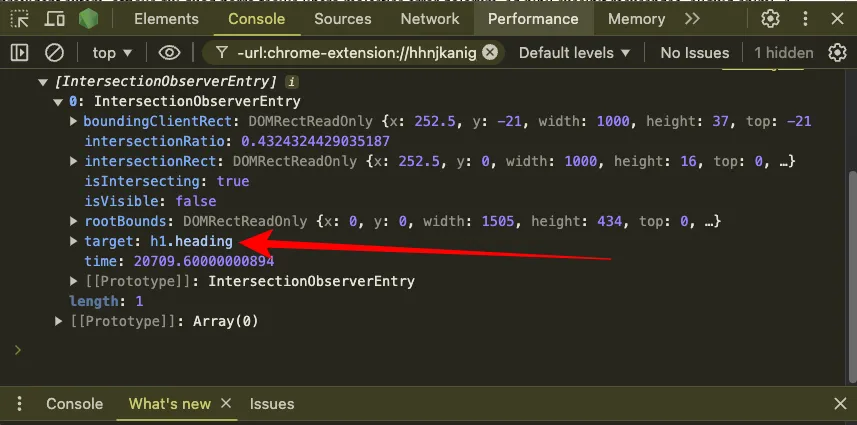
You can see that the target is indeed the h1 element with the class heading.
There’s also an isIntersecting property you can use to check if the target element is in the viewport.
Let’s loop through the entries (only h1 for now, actually) and do something using the isIntersecting property based on whether the h1 is in the viewport or not:
const observeh1 = new IntersectionObserver((entries) => { entries.forEach((entry) => { if (entry.isIntersecting) { console.log('h1 is in the viewport!'); } else { console.log('h1 is out of the viewport!'); } });});
observeh1.observe(h1);Here’s the result:
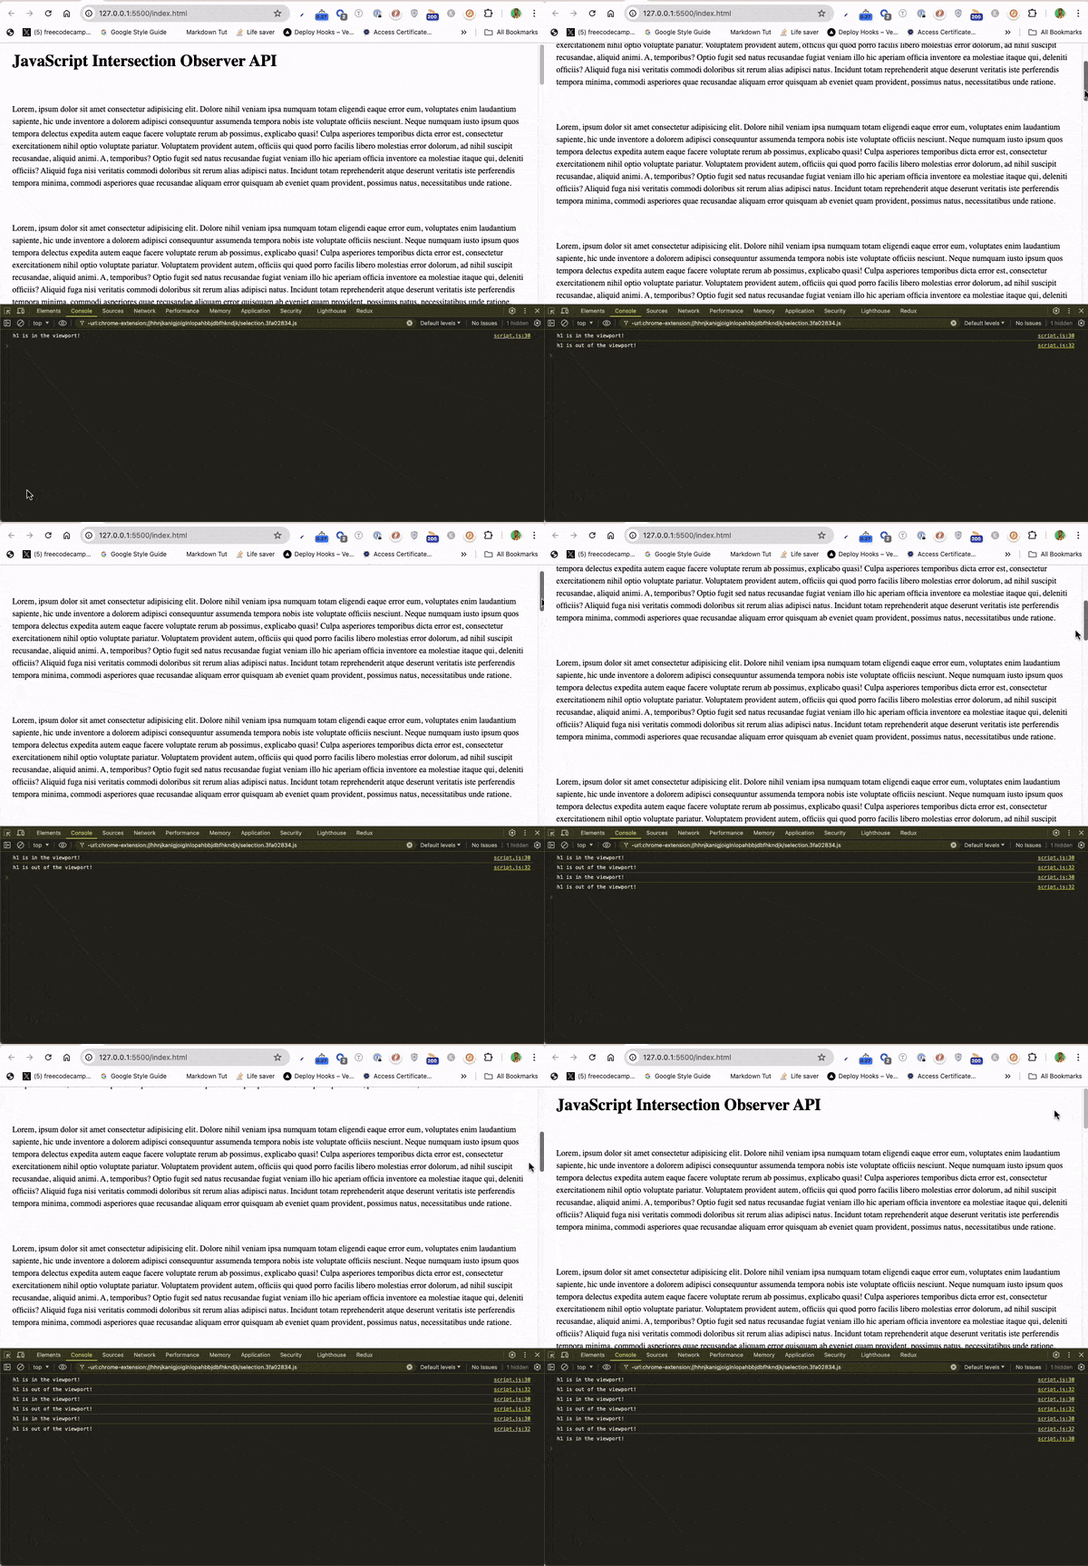
Isn’t that what we all call “cool”?
You can take things further and assign some style to the target element once it’s in the viewport:
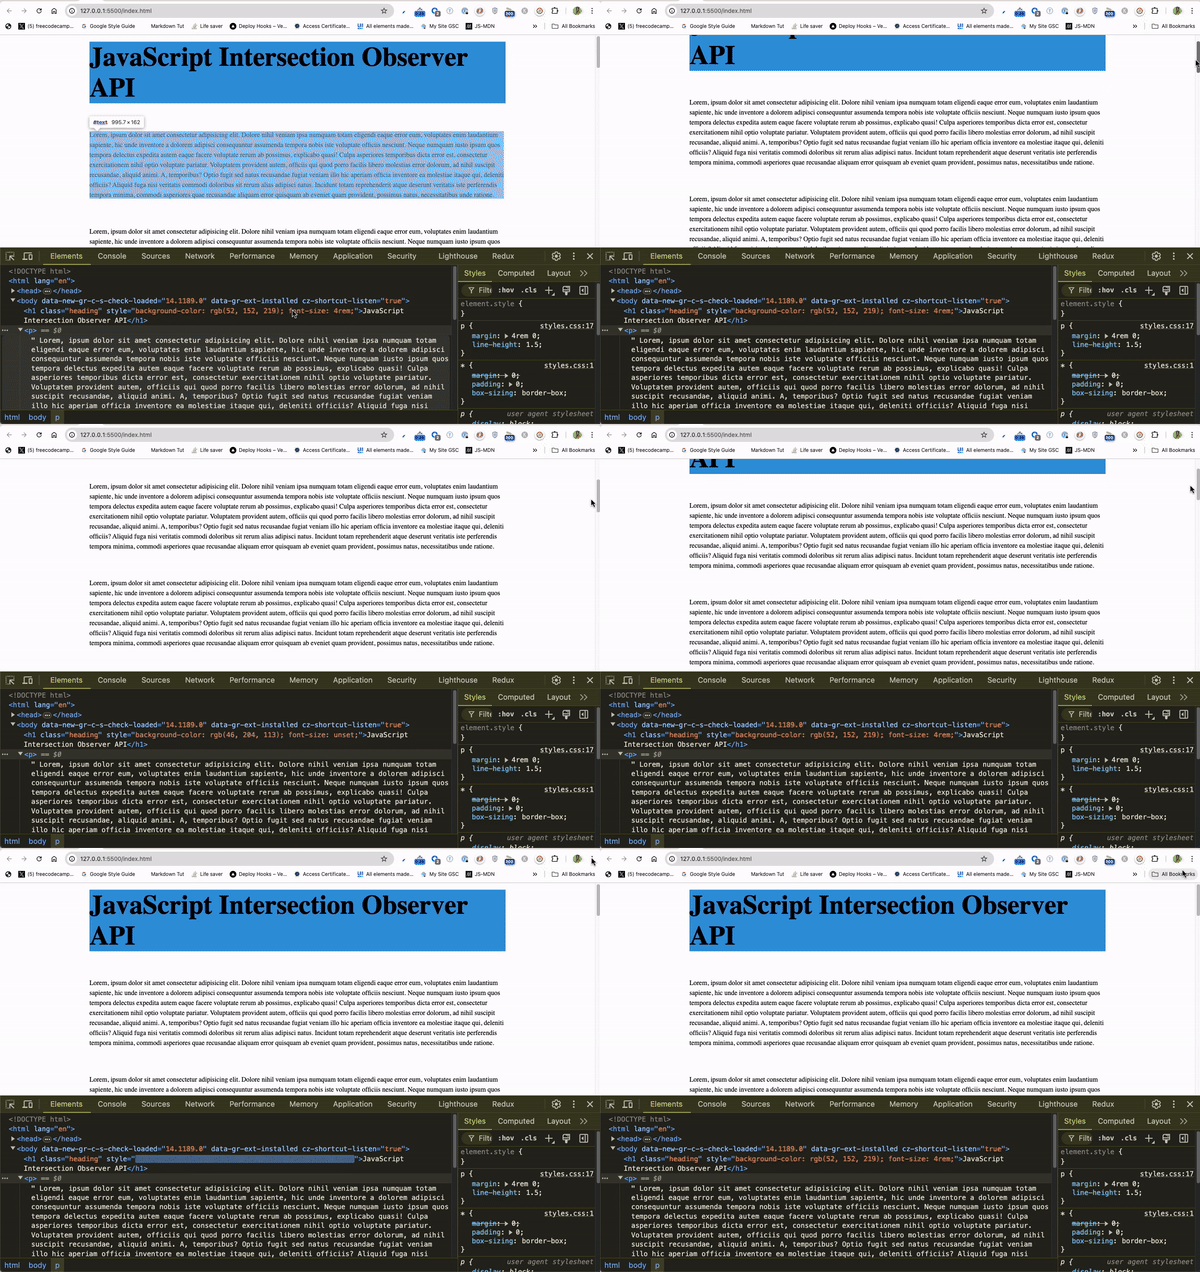
const observeh1 = new IntersectionObserver((entries) => { entries.forEach((entry) => { if (entry.isIntersecting) { console.log('h1 is in the viewport!'); entry.target.style.backgroundColor = '#3498db'; entry.target.style.fontSize = '4rem'; } else { console.log('h1 is out of the viewport!'); entry.target.style.backgroundColor = 'unset'; entry.target.style.fontSize = 'unset'; } });});For the optional options object, I’ll pass in the following:
const observeh1 = new IntersectionObserver( (entries) => { entries.forEach((entry) => { if (entry.isIntersecting) { console.log('h1 is in the viewport!'); entry.target.style.backgroundColor = '#3498db'; entry.target.style.fontSize = '4rem'; } else { console.log('h1 is out of the viewport!'); entry.target.style.backgroundColor = '#2ecc71'; entry.target.style.fontSize = 'unset'; } }); }, { root: null, rootMargin: '200px', threshold: 0.5, });
observeh1.observe(h1);Don’t be confused. Here’s what those mean:
- a
rootofnullmeans the observer will use the entire browser viewport as the area to watch for visibility changes - a
rootMarginof200pxmeans the observer will add an extra200pxaround the root area (the entire browser viewport for this example) , so elements will be considered visible even when they are still 200 pixels outside the root - a
thresholdof0.5means 50% of the element needs to be visible before the observer callback will be triggered
This is what things look like now:
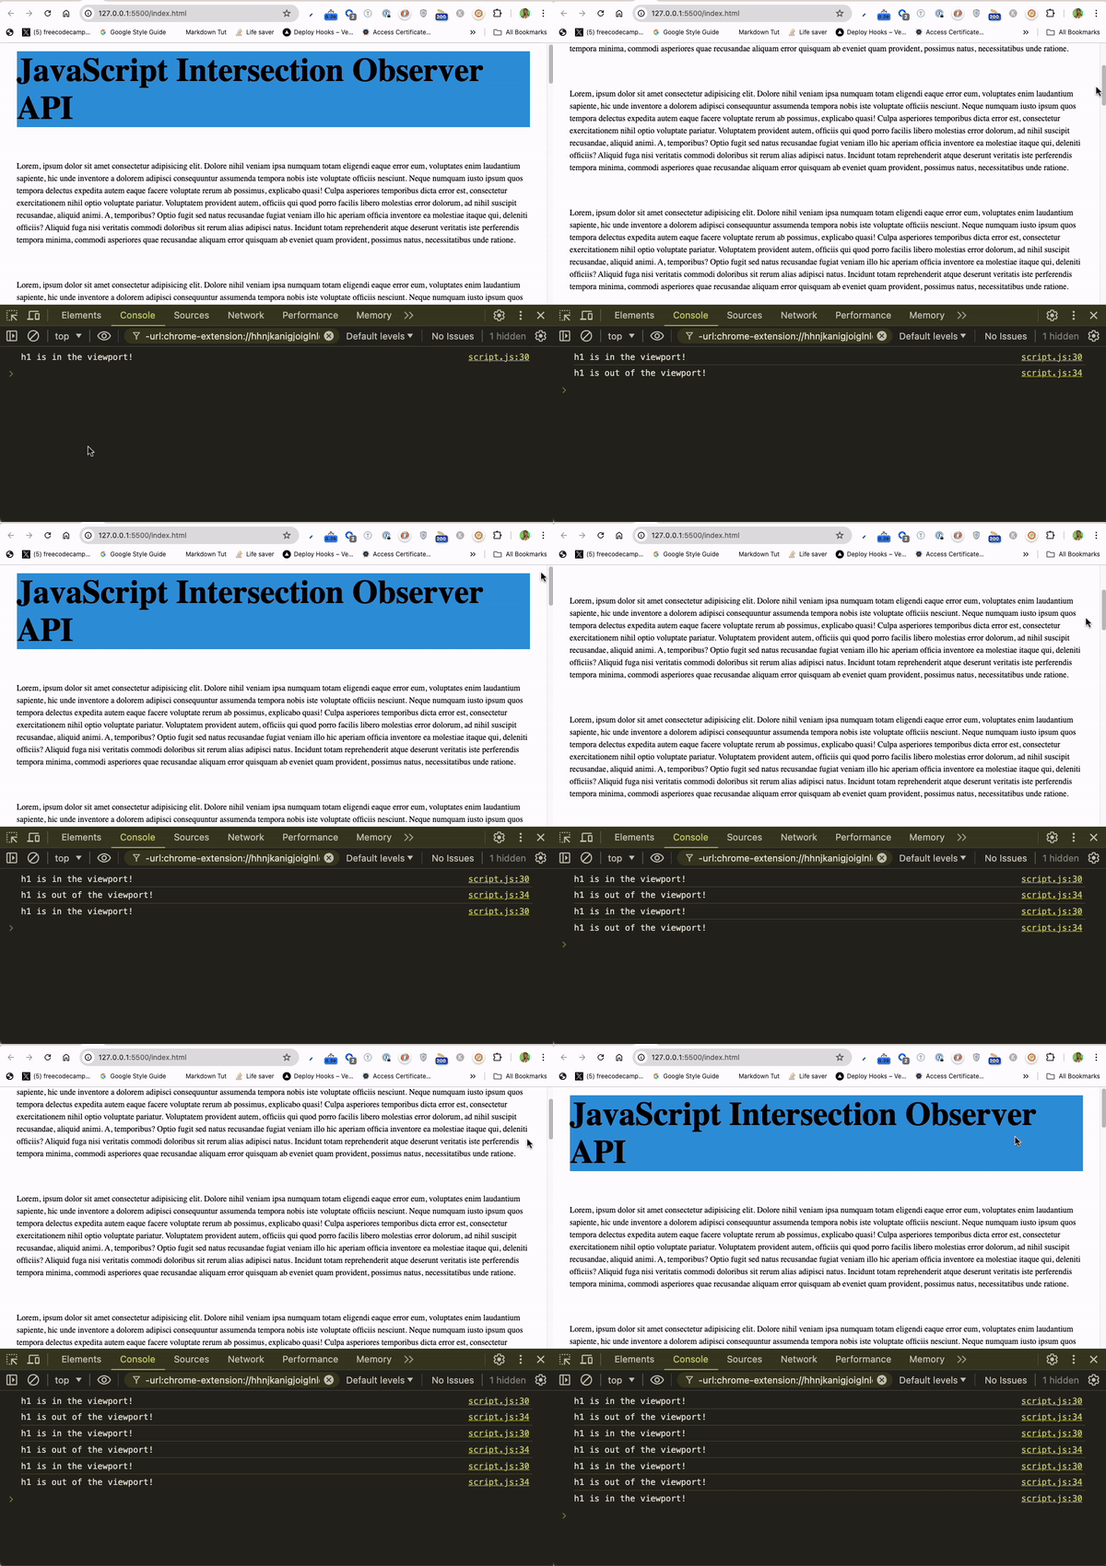
In case you’re doubting it, things really do change if you inspect the h1 element:
Example 2: Defining the Callback and Options Outside of the IntersectionObserver Constructor
You don’t have to fill up the IntersectionObserver constructor with the callback function and options parameters. You can define both outside and reference them inside the constructor.
To show you how to do this, let’s observe the box inside the HTML code. Here’s the fully commented code that shows you what’s going on:
const box = document.querySelector('.box');
// Define the callback function outside the constructorconst observerCallback = (entries) => { entries.forEach((entry) => { if (entry.isIntersecting) { // Once the box is within the viewport:
// 1. Log "Box is in the viewport!" to the console console.log('Box is in the viewport!'); // 2. Change the background color to blue entry.target.style.backgroundColor = '#3498db'; // 3. Add a class that animates the box entry.target.classList.add('animate'); } else { // Once the box is outside the viewport:
// 1. Log "Box is out of the viewport!" to the console console.log('Box is out of the viewport!'); // 2. Change the background color to green entry.target.style.backgroundColor = '#2ecc71'; // 3. Remove the class that animates the box entry.target.classList.remove('animate'); } });};
// Define the optionsconst observerOptions = { root: null, rootMargin: '0px', threshold: 0.5,};
// Define the constructor and reference the callback function and the optionsconst observer = new IntersectionObserver(observerCallback, observerOptions);
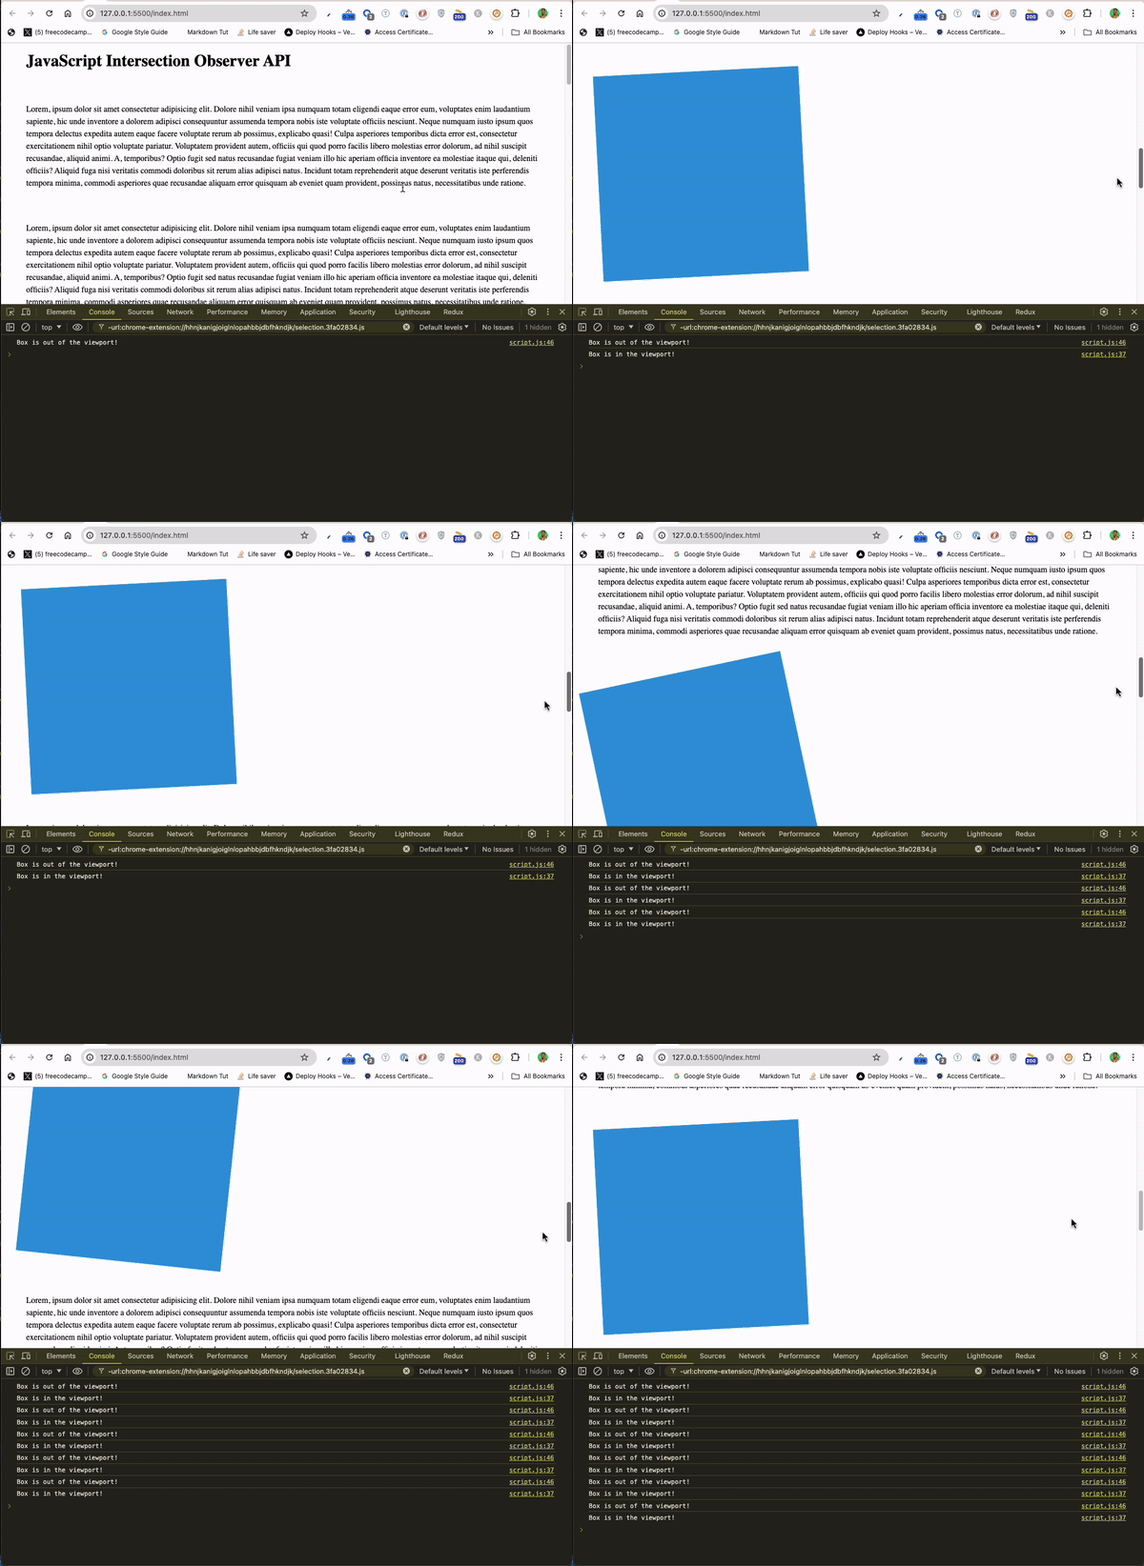
// Observe the boxobserver.observe(box);Here’s what’s happening to the box now:
Pardon the interruption
Join my Free Newsletter
Subscribe to my newsletter for coding tips, videos from reputable sources, articles from OG tech authors, and a ton of other goodies.
No BS. No fluff. Just pure software development goodies on a Sunday every week.
Back to the intersection observer API
Example 3: How to Observe Multiple Elements with the IntersectionObserver API
Observing multiple element with the IntersectionObserver API works a bit differently.
To do that, you need to do these:
- select your elements from the HTML with
querySelectorAll()or other relevant methods - define your callback and options as usual
- supply the callback and the options parameters into the
IntersectionObserverAPI constructor - loop through the target elements with
forEachand observe them inside it
Here’s how I was able to observe the circle and box on the page:
// select the target box and the circle with querySelectorAll()const targets = document.querySelectorAll('.box, .circle');
//define the callback functionconst observerCallback = (entries) => { entries.forEach((entry) => { // Once the targets are within the viewport: if (entry.isIntersecting) { // 1. Log "[target] is in the viewport" to the console console.log(`${entry.target.className} is in the viewport!`); // 2. Add a blue background color to the targets entry.target.style.backgroundColor = '#3498db'; // 3. Animate the target entry.target.classList.add('animate'); } else { // Once the targets are out of the viewport:
// 1. Log "[target] is out of the viewport" to the console console.log(`${entry.target.className} is out of the viewport!`); // 2. Add a green background color to the targets entry.target.style.backgroundColor = '#2ecc71'; // 3. Remove the animation from the target entry.target.classList.remove('animate'); } });};
// define the optionsconst observerOptions = { root: null, rootMargin: '0px', threshold: 0.5,};
// pass the callback and options into the constructorconst observer = new IntersectionObserver(observerCallback, observerOptions);
// loop through the selected targets and observe themtargets.forEach((target) => observer.observe(target));Here are the box and the circle intersecting:
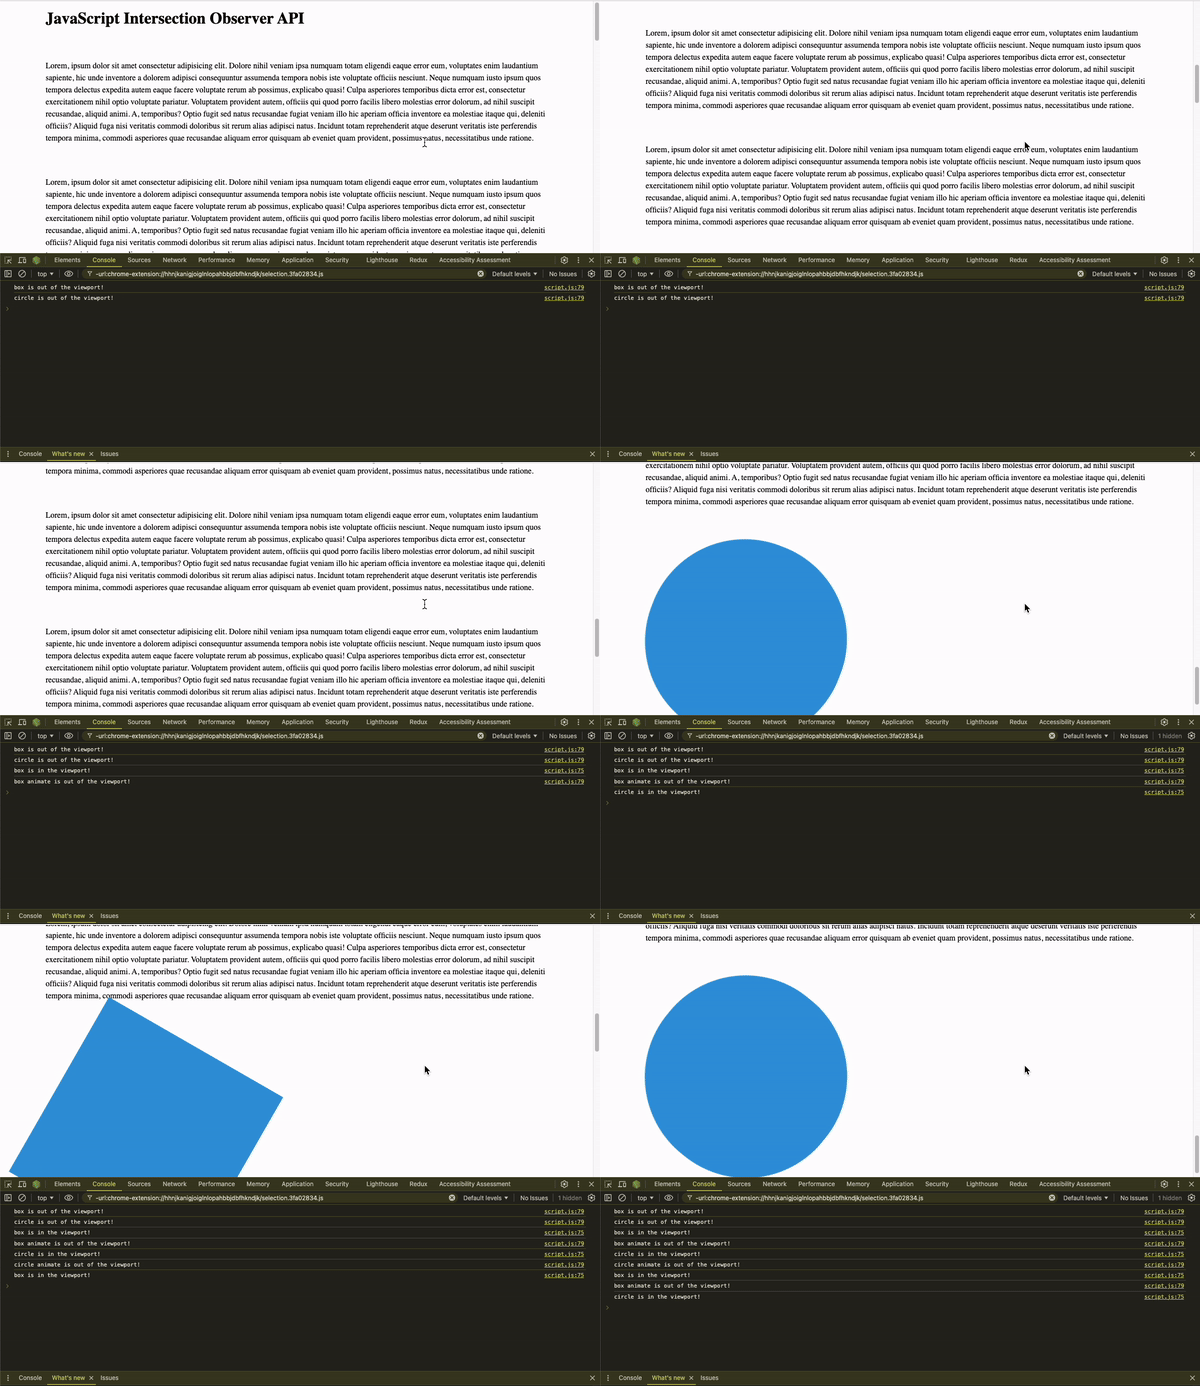
You can see that in the second and third examples, the animation is only triggered once the user scrolls to them. This can be useful when you’re dealing with expensive animations or other processes.
The Intersection Observer API improves user experience by ensuring elements load and animate only when needed, reducing unnecessary processing and enhancing performance. It’s an excellent tool for creating responsive, efficient, and engaging web interactions.
Start using the IntersectionObserver API in your projects now!